Table of Contents
Last update on
GZIP compression is a popular method for speeding up WordPress. When enabled on your site, it can help reduce the total size of your pages. It will also help you improve the Largest Contentful Paint and First Input Delay performance. In short, you’ll make sure your content is delivered to your visitors faster and reduces their data usage.
While the term “GZIP” may sound technical, the basic idea behind it isn’t all that complicated. In fact, enabling GZIP on your WordPress site is surprisingly easy since all modern browsers support it and automatically negotiate GZIP compression for HTTP requests.
In this post, we’ll explore what GZIP compression is, how to check if it’s enabled on your WordPress site, and if it’s not enabled, I’ll show you how to turn it on.
What is GZIP Compression?
GZIP is a free and open-source algorithm for file compression and decompression. Compression, as you’re no doubt familiar with, is the reduction in the size of data to save storage space. GZIP is most often used to compress web pages on the server-side for decompression in the browser.
GZIP is mostly used for code and text files to reduce the size of your site’s HTML, CSS, and JavaScript. Compressed code is faster code, but exactly how much you save depends on what you’re compressing.
According to Google Developer Advocate and Web Perf Guru Ilya Grigorik, GZIP compression “often achieves compression rates of as high as 70-90%.”
Grigorik’s testing of the most popular JavaScript and CSS frameworks shows GZIP compression can produce savings of between 63-88%.
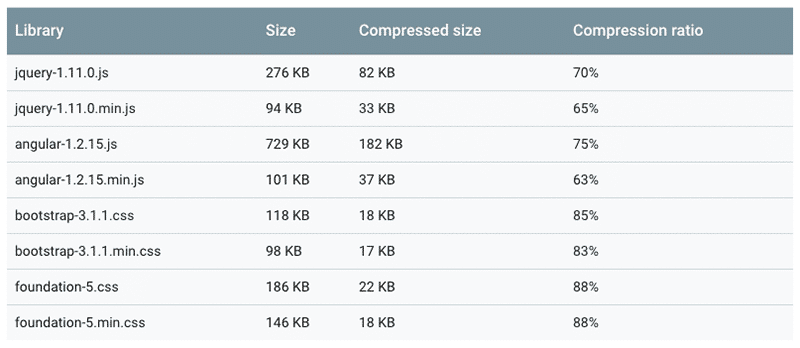
Image: Google Web Fundamentals.
GZIP is a popular method for compressing streaming media, but it doesn’t work on images—there are other methods available for optimizing and compressing images.
How GZIP Compression Works
GZIP works the same for any website, whether you’re using WordPress or some other CMS. Let’s break it down:
- When a server receives a request for a web page, it checks the header of the request to determine if the browser supports GZIP.
- If it does, the server generates the markup for the web page and then applies GZIP.
- GZIP converts the markup into a compressed data stream, which is then transferred to the browser.
- When the browser receives the stream, it decompresses it and displays it to the user.
- If the browser doesn’t support GZIP, the webserver serves up an uncompressed data stream.
How to Check if GZIP Compression is Enabled on Your WordPress Site
Before you go enabling GZIP on your site, it’s a good idea to check if it’s already switched on.
While GZIP compatibility used to be an issue with older browsers, it’s so widely supported nowadays that you would be hard-pressed to find a browser that doesn’t support it.
- Internet Explorer 5.5+ (since July 2000) and IE 4 if set to HTTP/1.1
- Netscape 6+ (since November 2000) and Netscape 4-5, but with some bugs
- Opera 5+ (since June 2000)
- Firefox 0.9.5+ (since October 2001)
- All versions of Chrome (since always)
- All versions of Safari (since forever, as far as I can tell)
As you can see, browsers have supported the content-encoding: gzip HTTP response header, which handles GZIP compression, for almost 20 years.
So you’re covered as far as browser support goes—it’s your web server that you need to worry about. While many web hosts support GZIP by default, some shared hosts don’t by default.
There are a few different ways you can check if your host supports GZIP compression.
1. Use the Check GZIP Compression Tool
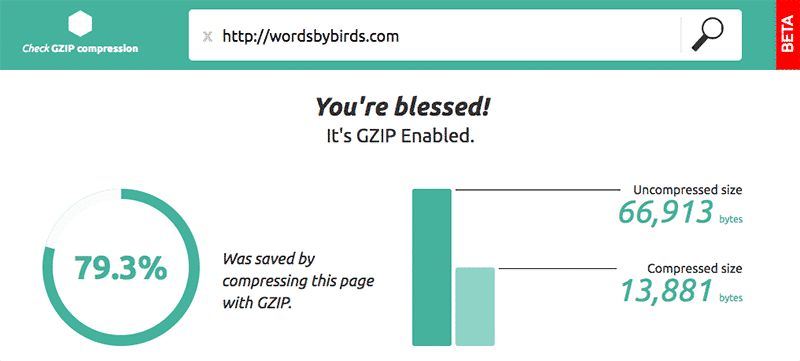
The easiest way to check if your site has GZIP enabled is to head over to Check GZIP Compression and scan your site. This free tool checks if your web server sends the GZIP HTTP header to your visitors’ browsers.
What’s great about this useful tool is that it also tells you the total size of your site, both compressed and uncompressed, so you can see how much GZIP is saving you. In my case, I’ve saved 79.3%!
The folks who built this tool have also released a free plugin, Check and Enable GZIP compression, if you want quick access to this tool in the backend of your site.
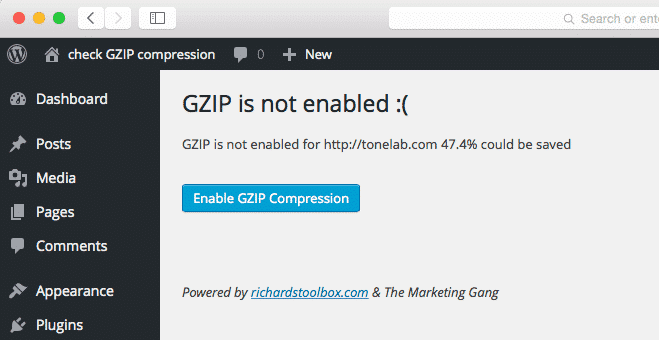
Image: WordPress.org.
Something worth keeping in mind is that GZIP can also compress your static assets. So if you’re serving up content from a CDN you’ll want to ensure GZIP compression is turned on. All modern CDNs support GZIP compression, including Cloudflare and CloudFront. But if you want to check, simply enter one of your CDN-hosted files into the Check GZIP Compression tool so you know for sure.
2. Scan Your Site With GTmetrix
Another way to check for GZIP compression on your site is with GTmetrix. When you scan your site, GTmetrix will throw up a recommendation to enable GZIP if your site isn’t using it.
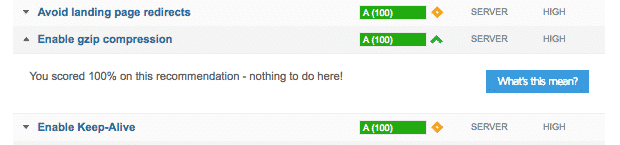
In my case, GZIP is enabled. But if it wasn’t, GTmetrix would suggesting that I turn it on for static resources.
3. Create a phpinfo File
If you like getting hands-on (and you’re also interested in learning about other PHP settings for your site) you might want to create a phpinfo page.
To do this, you just need to create a new page for your site. Here’s how to do it via cPanel:
- Log in to cPanel for your site and open the file manager.
- Navigate to the directory you are working with, i.e. the root folder for your site, which should be public_html.
- Create a new file and name it phpinfo.php (it actually don’t matter what you call this file, but phpinfo.php is what people commonly use).
- Open the file and enter the following code:
<?php phpinfo(); ?> - Save your changes.
- Open a new tab in your browser. If you created the file in your site’s root folder (i.e. public_html), go to example.com/phpinfo.php to view your new phpinfo page.
- Scroll down the page and look out for the mod_gzip or mod_deflate modules. If they’re listed and enabled, GZIP compression is available.
4. Check Your HTTP Headers
Another way you can see if GZIP compression is enabled is using Chrome DevTools to check your site’s heads. To do this:
- Go to your site and inspect it using Chrome DevTools.
- Open the Network tab and reload the page.
- Select any HTTP request in the left panel and the HTTP headers will be displayed in the right panel.
Look through your response headers for content-encoding: gzip. If it’s there, GZIP compression is enabled.
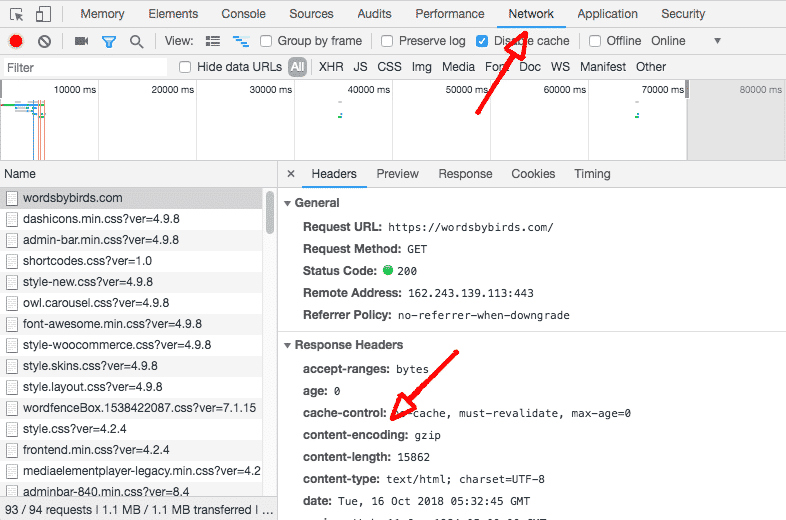
While you’re here, you can also check the compressed and decompressed size of your page. Click “Use large request rows” and close the right panel. Next to your first HTTP request in the Size column you can see below that uncompressed my home page is 79 KB and the GZIP version is only 15.8 KB.

How to Enable GZIP Compression for Your WordPress Website
If you’ve checked your site and GZIP isn’t enabled, there are several different ways you can go about switching it on.
1. Ask Your Host
If you’d rather have someone else take care of enabling GZIP for you, get in touch with your web host and ask them to do it for you. Enabling GZIP is a simple process that should only take your host 5 minutes to set up. If you work with a reputable host, GZIP should be part of their standard service.
2. Use a Plugin
We’re talking WordPress here, so of course there’s a plugin that can take care of GZIP for you. In fact, there are a few different free and premium options.
The Check and Enable GZIP compression, which I mentioned earlier, also lets you turn GZIP or and off from the WordPress dashboard. Before you dive into using this free option, I recommend having a read over the reviews to decide if it’s for you. I suggest testing it on your staging site first.
Most caching plugins come with GZIP support built-in. WP Rocket, for example, adds GZIP compression rules to your .htaccess file automatically using the mod_deflate module (for Apache sites). So if you’re using WP Rocket, you don’t have to do anything—GZIP is already enabled and working on your site!
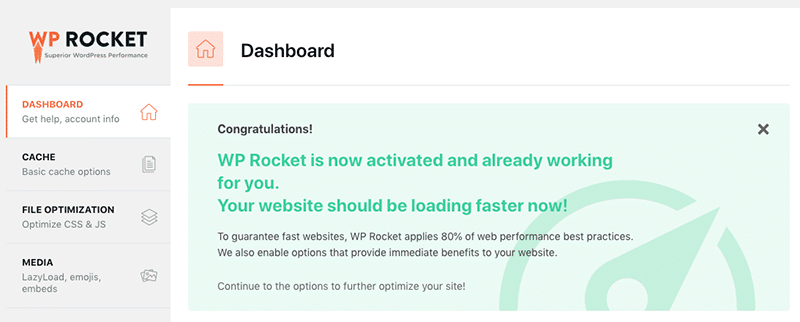
GZIP compression is completely automated in WP Rocket; it doesn’t appear in the plugin’s settings, but quietly works its magic under the hood to make your site faster.
3. Enable GZIP Compression on Apache
If your site is hosted on a shared server, you can add the following code to your .htaccess file. You’ll find this file in the root folder of your site using cPanel, FTP, or whatever method you use to access your site’s files.
<IfModule mod_deflate.c> |
Make sure you add the code above after any other directives that are already in your .htaccess file. Thanks to GTmetrix for the above code.
4. Enable GZIP Compression on NGINX
If your site is hosted on an NGINX server, enabling GZIP compression is super easy. Simply open up your nginx.conf file and add the following directive:gzip on;
GZIP might already be enabled, so scroll through the file first and check before making any changes.
For more on how to configure compression and decompression on NGINX, check out this handy guide on the NGINX site. There’s also a great tutorial on how to fine-tune GZIP for NGINX on the TechRepublic site.
5. Enable GZIP Compression on IIS
If your site is hosted on a server running IIS, follow these instructions in the Microsoft TechNet document to enable compression.
Conclusion
While there are many ways to improve the performance of your WordPress site, enabling GZIP compression is one of the easiest to implement. Simply switching it on can instantly help decrease the size of your files, get your content to your visitors faster, and improve Core Web Vitals’ performance.
GZIP has been around for 20 years so you shouldn’t have a problem getting it to work with any modern browser. You’ll just need to check that it’s available with your hosting. Not sure if your site is using GZIP already? You can use any of the verification methods I’ve listed above to see if it’s working.
If you have WP Rocket activated on your site, GZIP is already enabled and working under the hood to speed up your site. As I mentioned, there are no settings for this feature in the plugin—it’s completely automated.
If you have any questions about GZIP compression or any of the methods mentioned in this article, leave a comment below!
