Table of Contents
Last update on
Rarely, if ever, do we get a formal notification of Google’s algorithm updates from the search engine giant itself. So, when Google does announce something officially, the entire internet marketing community jumps on it.
The same happened on one fine April morning in 2010 when Google announced that site speed was now a search ranking factor. If you want to improve site speed, you should focus on the speed of individual pages first.
Why does loading time matter? Visitors won’t tolerate slow sites anymore now with increased internet speeds. It also takes longer for search bots to crawl a slow site.
What is Browser Caching and How Can we Leverage It?

When a web page loads, all of its resources i.e. images, CSS files, the HTML code of the page, and the javascript files will be loaded separately. Many requests traveling from browser to the server can increase the server load and increase your page’s loading time.
Browser caching is a way to speed up web page loading by storing the frequently accessed resources in the local memory of the device (your computer or mobile device). Since requests are not made to the server, loading time for these resources is greatly reduced.
When you implement browser caching, you are effectively asking the browser to store the commonly-used but rarely-updated files locally in its own cache memory. This reduces the server load, improves the page loading speed and the overall WordPress website performance, and gives a boost to the Core Web Vitals score.
Does Your Site Use Browser Caching?
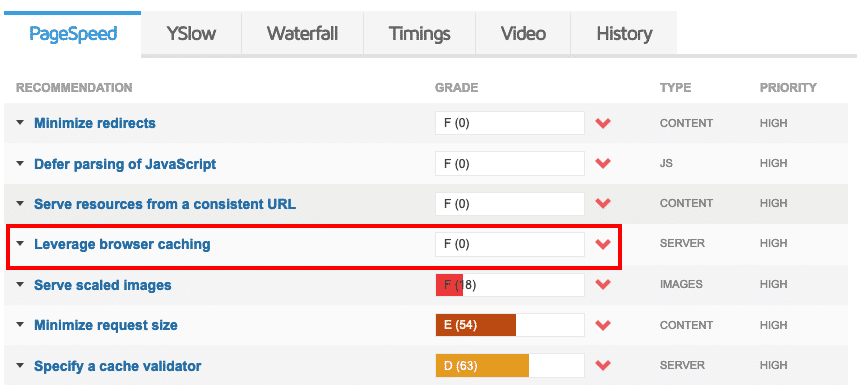
One use of GTMetrix speed testing tool is to find out if your site is already taking advantage of browser caching or not:

If you see the “Leverage browser caching” message, click the “Show how to fix link” to see which files are referenced. If the files are hosted on your own domain, read on to see how to apply browser caching.
To make things easier, get WP Rocket and let it do the job for you!
Browser Caching is Configured on the Server End
When the server has to tell the client (ie. the browser) to do something, it will send extra information via the HTTP Headers. To activate caching in the browser, we will be looking at “Expires” and “Cache-Control” HTTP headers.
The “Expires” header is a basic way to enable caching on the browser. It specifies a time duration after which the resource will be deleted. If the server doesn’t include this header (which is why you got the browser caching warning in PageSpeed Insights), all the resources will be downloaded from the server with each new request.
The “Cache-Control” header is more detailed and gives fine-grained options to control the caching behavior of the browser. We won’t be discussing these options in detail (you can check that on this MDN web page).
It would be a bit redundant to activate both these headers at the same time.
WP Rocket automatically applies the necessary Expires rules in the htaccess file if you are on an Apache server. So you don’t need to take any manual steps if you are using WP Rocket :). The plugin will take care of everything and help you optimize the Largest Contentful Paint score.
If you are not using WP Rocket you can manually enable browser caching with the following instructions.
Enabling Browser Caching on Apache Servers
Both the headers (Expires and Cache-Control) are to be added to the “.htaccess” file in your website root folder i.e. “public_html” folder. You can edit this file by downloading a copy via FTP, saving a backup copy locally and then uploading the edited version, or by logging into your hosting provider’s cPanel administration.
This is an important configuration file and if there are errors in it, it could break or blank your sites completely. Therefore, it is recommended that you copy and paste the contents of this file into a text file as a backup before you begin editing this file. This is needed because cPanel may not provide backups of previous versions.
If you want to enable the “Expires” header on Apache servers, add the following lines at the end of the “.htaccess” file in your website root folder i.e. “public_html” folder:
[pastacode lang=”bash” manual=”%23%23%20EXPIRES%20CACHING%20%23%23%0A%3CIfModule%20mod_expires.c%3E%0AExpiresActive%20On%0AExpiresByType%20image%2Fjpg%20%22access%20plus%201%20year%22%0AExpiresByType%20image%2Fjpeg%20%22access%20plus%201%20year%22%0AExpiresByType%20image%2Fgif%20%22access%20plus%201%20year%22%0AExpiresByType%20image%2Fpng%20%22access%20plus%201%20year%22%0AExpiresByType%20text%2Fcss%20%22access%20plus%201%20month%22%0AExpiresByType%20application%2Fpdf%20%22access%20plus%201%20month%22%0AExpiresByType%20text%2Fx-javascript%20%22access%20plus%201%20month%22%0AExpiresByType%20application%2Fx-shockwave-flash%20%22access%20plus%201%20month%22%0AExpiresByType%20image%2Fx-icon%20%22access%20plus%201%20year%22%0AExpiresDefault%20%22access%20plus%202%20days%22%0A%3C%2FIfModule%3E%0A%23%23%20EXPIRES%20CACHING%20%23%23%0A” message=”” highlight=”” provider=”manual”/]
Each of these headers sets a maximum age for a different file type from the date of the first request.
All image types are set to stay alive for a full year after the page is requested. We have given the age of 1 month to all CSS, Javascript, PDF, and shockwave flash (.swf) files. Icons will have an age of 1 year and all other static resources will have an age of 2 days.
In order for these rules to take effect, your server must have the mod_expires module enabled. Most servers do, but if adding these rules does not resolve the “leverage browser caching” message, check with your host to ensure mod_expires is enabled.
If you want to enable the “Cache_Control” header on Apache servers, add the following line to your “.htaccess” file in your website root folder i.e. “public_html” folder:
Enabling Browser Caching on NGINX Servers
An NGINX server is designed to be efficient. It doesn’t have an .htaccess file because the server needs to read it from every directory and that affects its performance negatively. NGINX has clarified about this on their website.
Therefore, you need to add all configuration for Expires or Cache-Control header in the main server block and reload for NGINX to read them.
To set the “Expires” header in NGINX, add the following lines to your server block:
[pastacode lang=”bash” manual=”location%20~*%20%5C.(jpg%7Cjpeg%7Cgif%7Cpng)%24%20%7B%0A%C2%A0%C2%A0%C2%A0expires%20365d%3B%0A%7D%0A%0Alocation%20~*%20%5C.(pdf%7Ccss%7Chtml%7Cjs%7Cswf)%24%20%7B%0A%C2%A0%C2%A0%C2%A0expires%202d%3B%0A%7D” message=”” highlight=”” provider=”manual”/]
To enable browser caching via the Cache-Control header on an NGINX server, add the following line to your server block, save and restart the server for changes to take effect:
[pastacode lang=”bash” manual=”https%3A%2F%2Fwww.nginx.com%2Fresources%2Fwiki%2Fstart%2Ftopics%2Fexamples%2Flikeapache-htaccess%2F” message=”” highlight=”” provider=”manual”/]
WP Rocket (or any caching plugin) can’t modify your NGINX config automatically, but you can implement the recommended configuration which takes care of browser caching and more.
Can Google Analytics Code Generate the “Leverage Browser Caching” Warning?
Google Analytics is the most advanced analytics engine. Practically every website uses it. But the code links to Google’s server so the browser treats it as an external resource and downloads a fresh copy.
Google does enable caching for this resource, but the age of the cached content is only 2 hours. While it may be justified from Google’s side (and you can’t really doubt the speed of Google’s own servers), some webmasters may want to eliminate this extra hop too.
To optimize and store Google’s own “analytics.js” file locally, you can use WP Rocket!
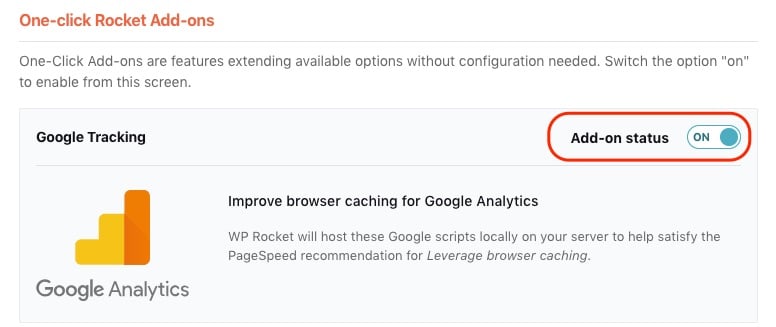
Go to the Add-ons tab in WP Rocket and toggle the Google Tracking Add-on to on:

For more info about this option, check out our documentation about the Google Tracking Add-On.
If you’re not using WP Rocket yet, you can install the Complete Analytics Optimization Suite (CAOS) plugin. This plugin gives you the option to choose where to insert the analytics code (header or footer) and keeps the analytics.js file updated using the wp_cron() functionality
Once downloaded locally on the client, then using the above mentioned “Expires” or “Cache-Control” headers, you can enable caching of the analytics.js file.
You will need to provide your Google Analytics tracking ID to this plugin. If you have another analytics plugin, the CAOS plugin won’t work. So make sure you spot and delete any other analytics plugins you might have currently installed on your WordPress site.
What About Caching Third-Party Scripts?
Sometimes, you may use plugins that require you to add some additional scripts from the developers’ chosen server, for example, social networks or ad servers. To enable caching of third-party scripts, you will have to contact the developers if they allow it. If the script is popular (like the Facebook Ad Pixel), you may find plugins for caching those.
WP Rocket is the easiest way to take care of the Google Analytics and the Facebook Pixel scripts!
Overall, it is totally dependent on the third-party developers whether they wish to enable caching of their scripts. If you see third party scripts listed under leverage browser caching, don’t worry too much about trying to apply browser caching to them. Focus on what you can control, and the overall load time of your site.

