Table of Contents
Last update on
Website speed optimization can be a complex and technical practice, but the non-techies out there will be happy to learn that one of the biggest problems is actually easy for the layperson to solve.
Images Are One of the Biggest Drains on Load Time
Images are typically one of the biggest drains on page load time. Even with caching and a CDN, an unoptimized image will still drag down your page loading time and affect the Largest Contentful Paint score. But, as the website owner, images are completely under your control. So, if you can get a handle on how to work with and optimize images, you can improve the speed of your site and boost the Core Web Vitals’ performance.
Based on the websites that I look at during my WP Rocket customer support duties, I see that images contribute, on average, about 30% of the total page load time. Often this is the single largest factor of the loading time. In extreme cases, it could be closer to 60% of the loading time.
Here’s an example of what un-optimized images will do to your site:
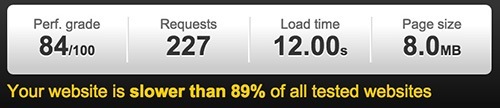
The load time is 12 seconds and the size of the page is 8MB. Of those 8MB, images account for 6.7MB. This is out of control!
The number of http requests is commonly cited as a factor in load time, and while it is important, ultimately it’s the page size that is the real indicator of speed or slowness. You can have a small number of http requests, but if those requests are summoning giant images, you will have a problem on your hands.
Reducing page size by reducing image size is a simple and effective strategy for improving load time.
File Size Matters: Why You Should Resize and Compress Images
Understanding image dimensions and file sizes
The dimensions of the image, i.e. how much space on the screen an image takes up, are measured in pixels and while they do not 100% dictate file size, they are related. The larger the dimensions of your image, the larger the file size.
The file size is measured in kilobytes (KB) and megabytes (MB)
1MB = 1000KB
To give you a point of reference, the main content column of this blog is 796 pixels wide.
If you take a photo with your smartphone, depending on your settings, that photo could be in the region of 2500 pixels wide (or even more) with a file size of 3MB (or 3000KB). If I were to take a photo with my phone and upload it to this blog without any editing, I’m going to be uploading a file that is about 3 times as big as it needs to be – a total waste of resources and a drag on page load.
So while snapping phone pics and uploading to your blog might be simple, it creates a real problem if you want a fast site, by adding tons of unnecessary weight.
Before you upload that photo, you need to do two things: resize it and compress it.
How to Resize Images
So the first thing you need to do is resize your images to the correct size for your site. For blog images, figure out how wide your blog’s content area is, and never upload an image wider than that. If it’s going to be used in a slider, make sure you determine the dimensions of the slider first.
How Do You Know How Wide Your Content Area Is?
If you know how to use the developer tools built into Chrome or Firefox, you can use that. But if that sounds scary there are simpler tools available.
If you’re on a Mac, there is a screen capture tool, Grab, already built-in, and when you outline an area on the screen it will tell you the pixels.
Or you can install the easy Page Ruler add-on for Chrome.
Once you’ve figured out what dimensions your images should be, you can use any of the below tools to resize your images accordingly:
Resizing Applications and Tools
- Photoshop
- GIMP – free, Windows & Mac
- Irfan View- free for Windows
- Preview for Mac – it’s already installed!
- Developers on Macs can check out sips, a command-line tool
Online Tools for Resizing
- Picmonkey.com
- Pixlr.com (also has a mobile app)
- Fotor.com (also has a mobile app)
It doesn’t matter which one you use – all you need to do is locate the resize feature. You’ll be able to enter the desired pixel width and the application will make sure the image stays in proportion by adjusting the height automatically.
Common Image Formats
Images on the web should be saved in either .jpg, .png, or possibly .gif
JPEGs are best used for photographs and general-purpose images where you do not need any transparency. You can compress them easily and get a smaller file size suitable for the web.
PNGs will often generate a larger file size so should only be used when you have an image that requires transparency.
GIFs are less frequently used. They have a limited range of color so can only be used for very simple images, but can produce a small filesize.
How to Compress Images?
So we’ve dealt with the physical dimensions of the image, now let’s deal with the ‘weight’ of the image. We want to compress the image to make it as lean and fast-loading as possible. The goal is to reduce the file size. There isn’t a magic number as to what each image should be, since it depends on how the image will be used. Images being used in a hero banner or slider will be bigger, but if you have a few of them, I’d aim to get each one down to 100KB or less.
Small images that are going to be used for thumbnails, logos etc will be much much smaller. The logo at the top of this blog, for example, is 3.8KB.
With compression there may be a slight loss in quality, so you’re looking for a balance between quality and file size. But always remember that the smaller the filesize, the faster the load time will be.
Applications to Compress Images
- Photoshop – make sure to use the Save For Web option
- GIMP
- ImageOptim (Mac)
Online Tools
- We have just launched our own image optimization tool, Imagify. You can use it via the website Imagify.io, or install the WordPress Imagify plugin.
You can also check our dedicated blog post to learn everything about the Imagify plugin.
WordPress Plugins
It’s preferable to resize and compress your image before you upload it to WordPress.
However, if your site is already live, you will need to deal with the images that are already there.
For the crucial images such as logos, headers and others that load on every page of your site, it would be best to make new versions of the images as described above, then install the Enable Media Replace plugin. This will allow you to simply replace existing images in your media library with the new, optimized ones, without breaking any links.
For the other images sitting in your media library, where it would be unrealistic to go through and fix them all individually,there are a few handy plugins that will help you.
Imagify
Late last year, the company behind WP Rocket decided to take load time optimization further by creating an image compression WordPress plugin: Imagify. Because images impact load times so much, a compression tool is the perfect complement to a caching plugin. We offer 3 modes of image compression to help you get real control over your load time performance.
Imagify can optimize your existing media library in bulk, or you can manually select which images to optimize.
If you build sites for clients or have a site with multiple users where you cannot ensure that everyone is using best practices and uploading nicely optimized images, Imagify can assist by automatically compressing and resizing images as they are uploaded.
Before and After Load Time Testing
If you need to benchmark the speed of your site or do before/after comparisons with images after optimizing, follow this guide on how to properly measure the load time of your site.
